It has been a while since our last release blog post which was on Nx 13.5. A lot has happened since then. So here we go!
Housekeeping and “core” cleanup
We keep optimizing the Nx core. This round we started doing some housekeeping and cleanup that will allow us to move more quickly in the future and add new features more easily. In particular we now have a single package nx that contains all the core and CLI related functionality that have previously been in @nrwl/cli and @nrwl/tao. This also results in a reduce number of packages you need to install in any Nx workspace. In fact, if you run add-nx-to-monorepo - our easy migration command for adding Nx to Yarn/NPM workspaces - you should now see a single nx package and not have any @nrwl/* packages at all.
Nx Daemon on by default
One of the core features of Nx is the calculation of the project graph. It is the basis for most other features in Nx like the affected commands, computation caching and calculation and topological sorting of parallelizing tasks during DTE. This is a I/O heavy operation. Whenever you change a file, the project graph needs to be re-calculated which involves reading the source files, analyze imports from other packages’ source files and external libraries.
Such a crucial and central feature like the project graph need to be as fast as possible. That’s the reason why we introduced the Nx Daemon, which is started automatically and runs in the background, watching for file changes and asynchronously recomputes and caches the project graph. As a result, whenever Nx runs an operation that requires the project graph, it is already there and ready to be used, without adding any additional delay to the operation that needs to be executed.
Read more on the docs: /guides/nx-daemon
Nx Cloud opt-in now points to “Yes” by default
When you set up a new Nx workspace with create-nx-workspace the question about opting into Nx Cloud will be pointed on “Yes” by default now.
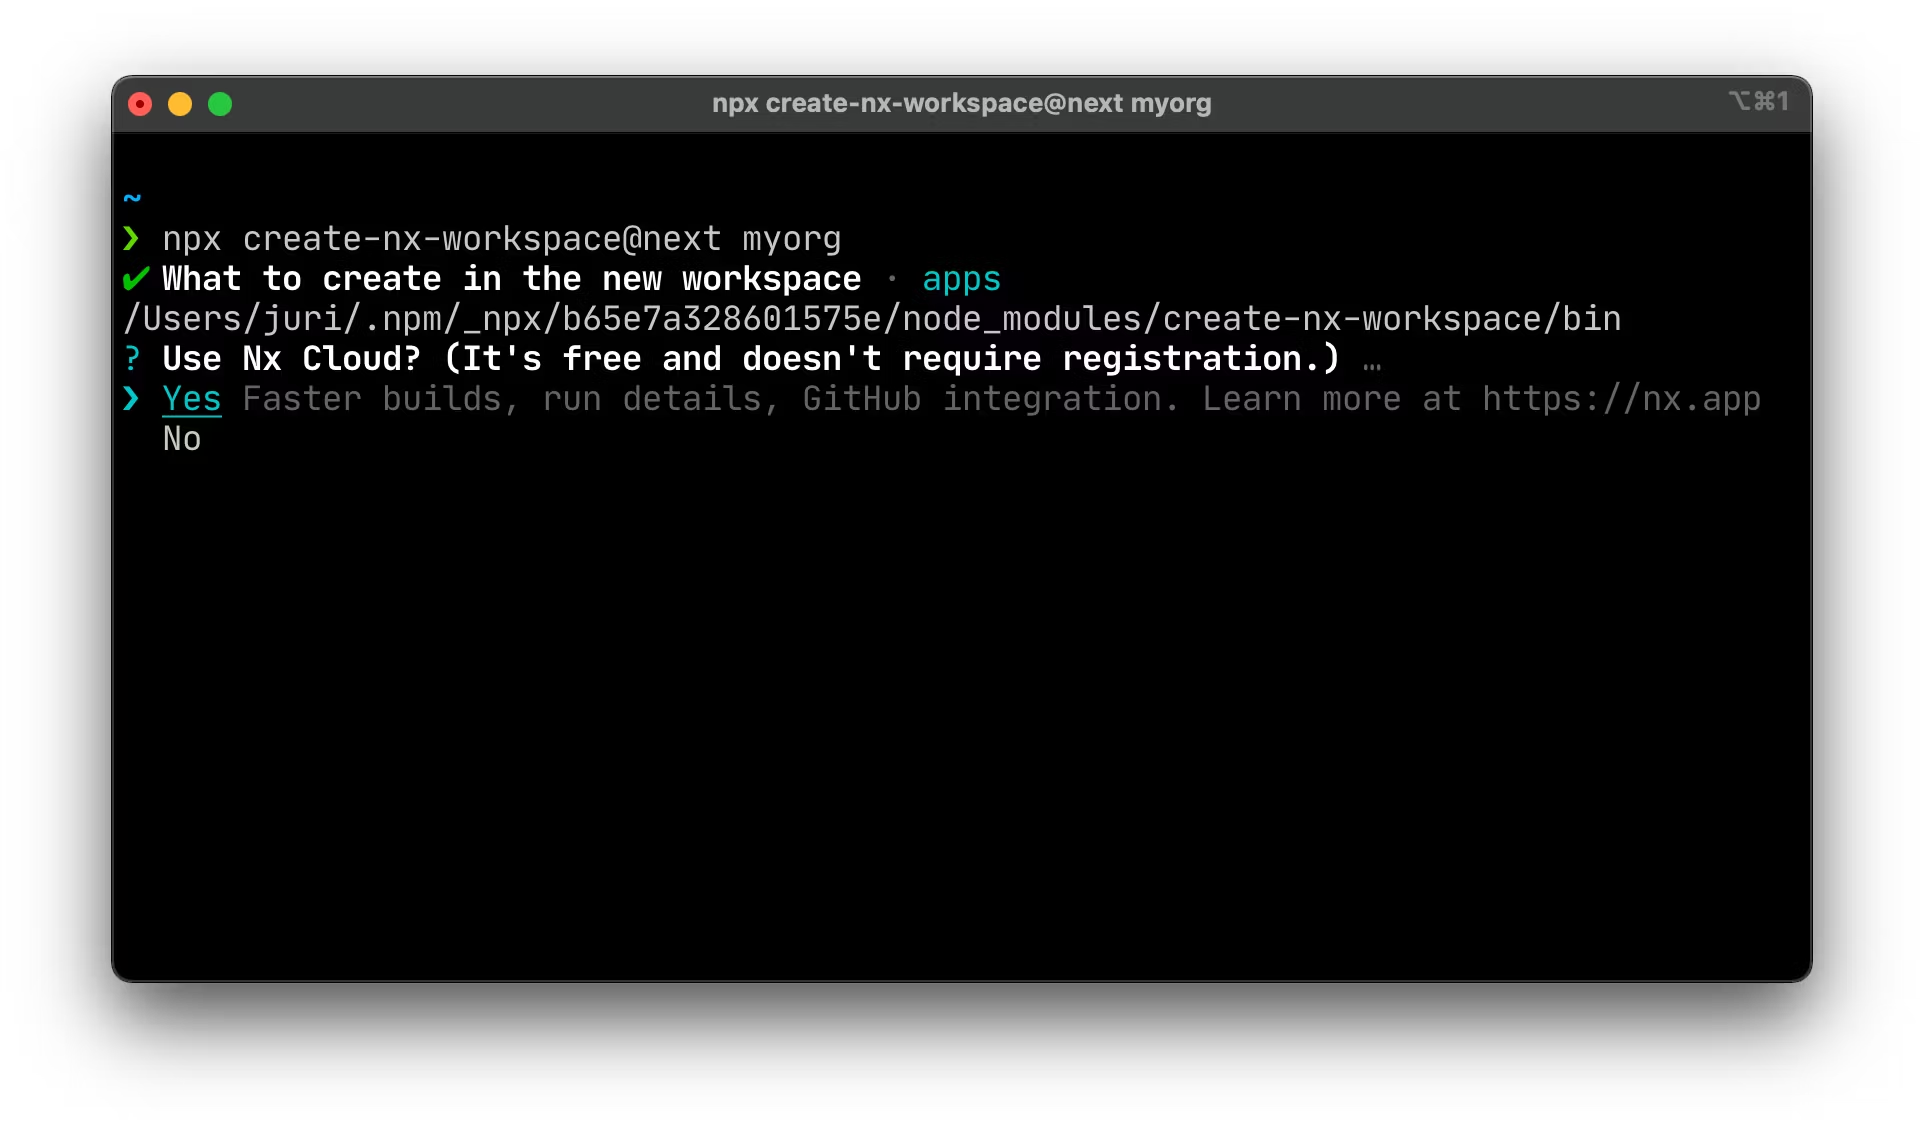 Nx Cloud opt-in when setting up a new Nx workspace
Build and run Nx Plugins locally in your Nx workspace
Nx can be used in a wide range of scenarios, from small open source projects, startup environments to massive enterprise monorepos. This is thanks to its modular plugin based architecture consisting of
- Nx core which provides the fundamental features such as the dependency graph calculation, computation caching and task execution
@nrwl/*plugins which are those actively maintained by the Nx core team- Community plugins
This illustration should give you a rough idea. obviously some of the plugins may be built on top of others, leveraging common functionality. An example is the @nrwl/js plugin which not only can be used as a standalone plugin but also builds the basis for of many others by providing core JavaScript/TypeScript features.
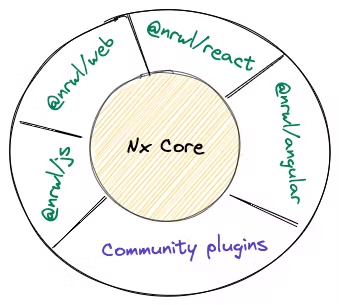
You can just use the Nx core without any plugins to get started and later decide to add more plugins such as @nrwl/react or @nrwl/js etc depending on your specific use case.
As you can see, plugins are at the very core and for quite some time now we’ve had a fully featured Devkit and Nx Plugin package to create your own. And the community followed: have a look at all the community Nx plugins that are available out there.
And we keep improving. Starting with Nx 13.10 you can now use Nx plugins to automate your local workspace. Install @nrwl/nx-plugin into your Nx workspace and generate a new plugin:
❯
npx nx generate @nrwl/nx-plugin:plugin --name=workspace-extensions
This creates a new library with a pre-configured setup to develop a Nx plugin. Similarly to other libraries you can now use those in your local Nx target configurations.
1{
2  root: 'apps/demo',
3  sourceRoot: 'apps/demo/src',
4  projectType: 'application',
5  targets: {
6    mybuild: {
7      executor: '@myorg/workspace-extensions:build',
8      outputs: ['{options.outputPath}'],
9      options: {
10        outputPath: 'dist/apps/someoutput',
11      },
12    },
13  },
14}
15
Note the executor definition of the mybuild target. It was never easier to create custom workspace executors.
And it doesn’t stop at the executors level. The local plugin setup comes with a generator setup too, which can be invoked just like
❯
npx nx g @myorg/workspace-extensions:<generator-name>
where @myorg is your Nx workspace name you defined and workspace-extensions the plugin library name we’ve chosen. You are free to choose whatever suits you best. This new setup opens up a wide range of new possibilities including defining default workspace generators.
Subscribe to our Youtube Channel for some upcoming tutorials and walkthroughs around this topic.
Project Graph Visualization
We keep improving our project graph and make it more and more useful for visually exploring your Nx workspace. You can now click on an edge and list the files that cause it which can be extremely valuable during debugging.
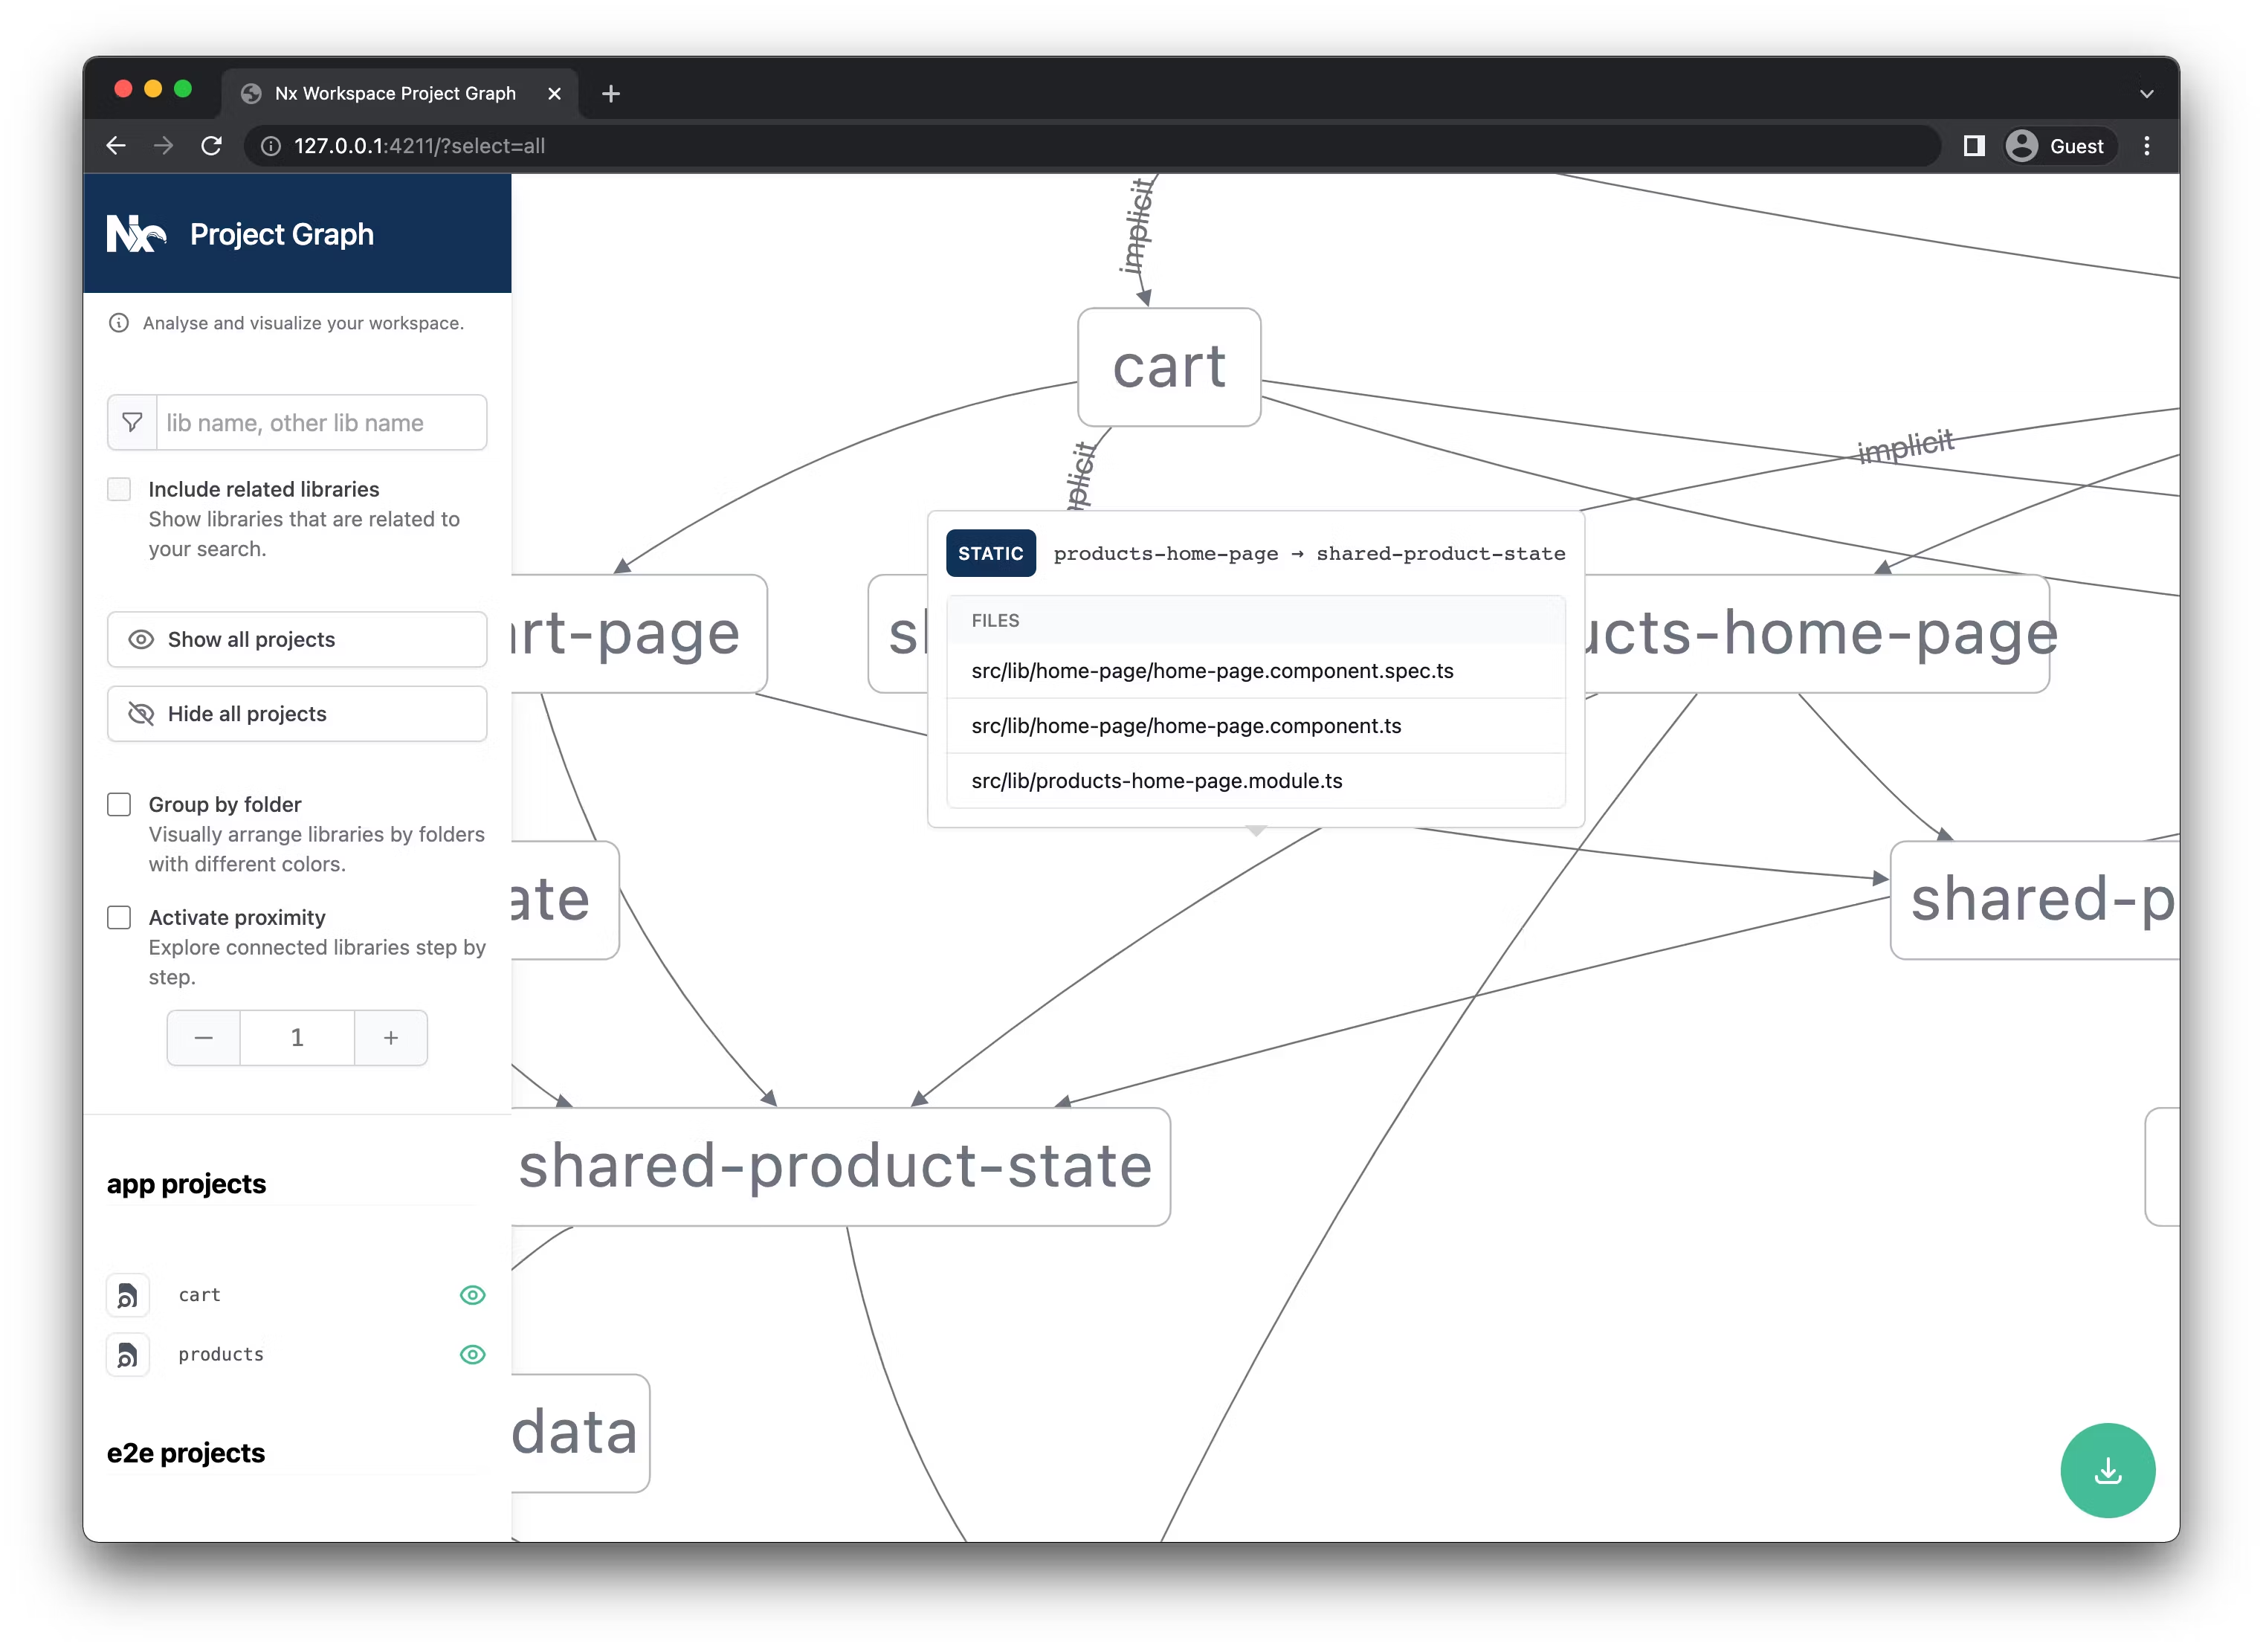 Improved Project Graph visualization showing information about the edges that connect nodes
And this is just a sneak peak of what’s coming in Nx v14, so stay tuned!
New “notDependOnLibsWithTags” Linter option
Having a decent monorepo setup is not always just about speed but also to have features in place that help you keep your code-base healthy and maintainable in the long run. The Nx module boundary lint rules are an example for that.
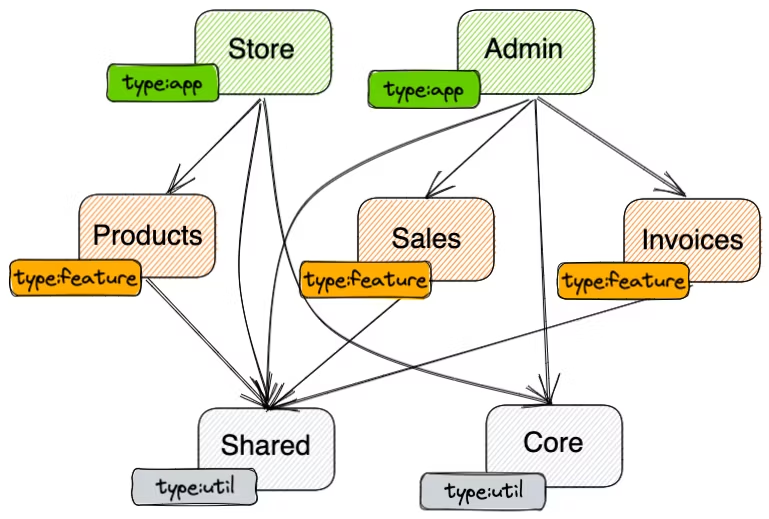 Tagging Nx projects
By assigning tags to your projects you can then configure which relationships among libraries and applications are allowed, and which are forbidden.
1{
2  // ... more ESLint config here "@nrwl/nx/enforce-module-boundaries": [
3    "error",
4    {
5      // update depConstraints based on your tags
6      "depConstraints": [
7        {
8          "sourceTag": "type:app",
9          "onlyDependOnLibsWithTags": ["type:feature", "type:util"]
10        },
11        {
12          "sourceTag": "type:feature",
13          "onlyDependOnLibsWithTags": ["type:feature", "type:util"]
14        },
15        {
16          "sourceTag": "type:util",
17          "onlyDependOnLibsWithTags": ["type:util"]
18        }
19      ]
20    }
21  ] // ... more ESLint config here
22}
23
Read more about it in this article: [blog/mastering-the-project-boundaries-in-nx)
So far you have only been able to specify which tags a library is allowed to depend on using the onlyDepndOnLibsWithTags property. This made it cumbersome to define in some situations. Now you have a brand new property notDependOnLibsWithTags
1{
2  // ... more ESLint config here "@nrwl/nx/enforce-module-boundaries": [
3    "error",
4    {
5      // update depConstraints based on your tags
6      "depConstraints": [
7        {
8          "sourceTag": "type:util",
9          "notDependOnLibsWithTags": ["type:feature"]
10        }
11      ]
12    }
13  ] // ... more ESLint config here
14}
15
More on Miroslav’s tweet:
Loading tweet...
Automatic Lint rule fixes for self circular dependencies and wrong imports across library boundaries
Whether by accident or by letting your IDE auto-add the import. It often happens that the path that is being used is via the library’s TS path mapping through the index.ts entry point. This leads to a circular dependency when also tslib-c-another.ts is exported via the index.ts. Nx’s module boundary lint rule correctly highlights this as can be seen in this screenshot.
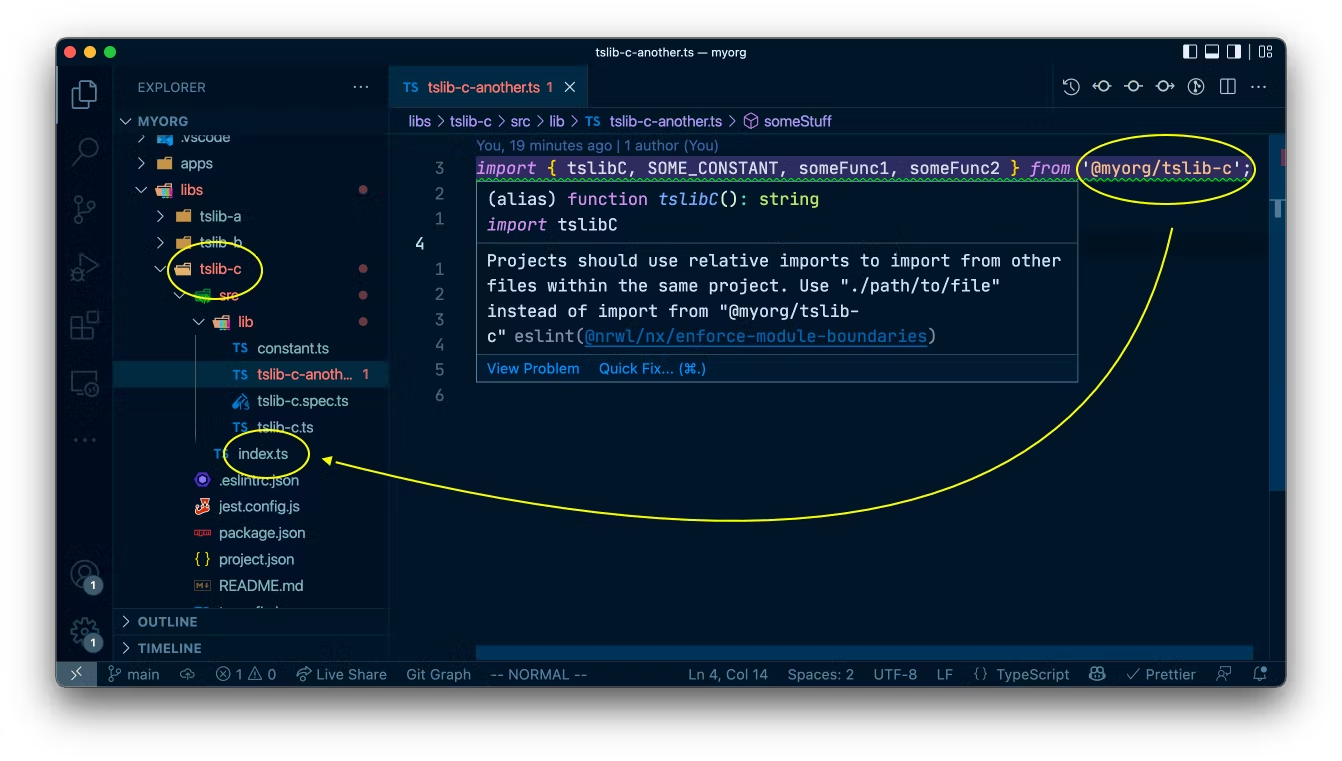 Self circular dependency issue within a Nx based library
Adjusting these circular self references is easy, but can be cumbersome to find the correct imports and time consuming if you have hundreds of libs that might be affected by this. In the latest version of Nx we shipped a fix implementation for these lint rules, such that you can now conveniently add --fix to auto-adjust the imports:
❯
npx nx lint tslib-c --fix
This will analyze your imports, find the correct file and adjust them accordingly:
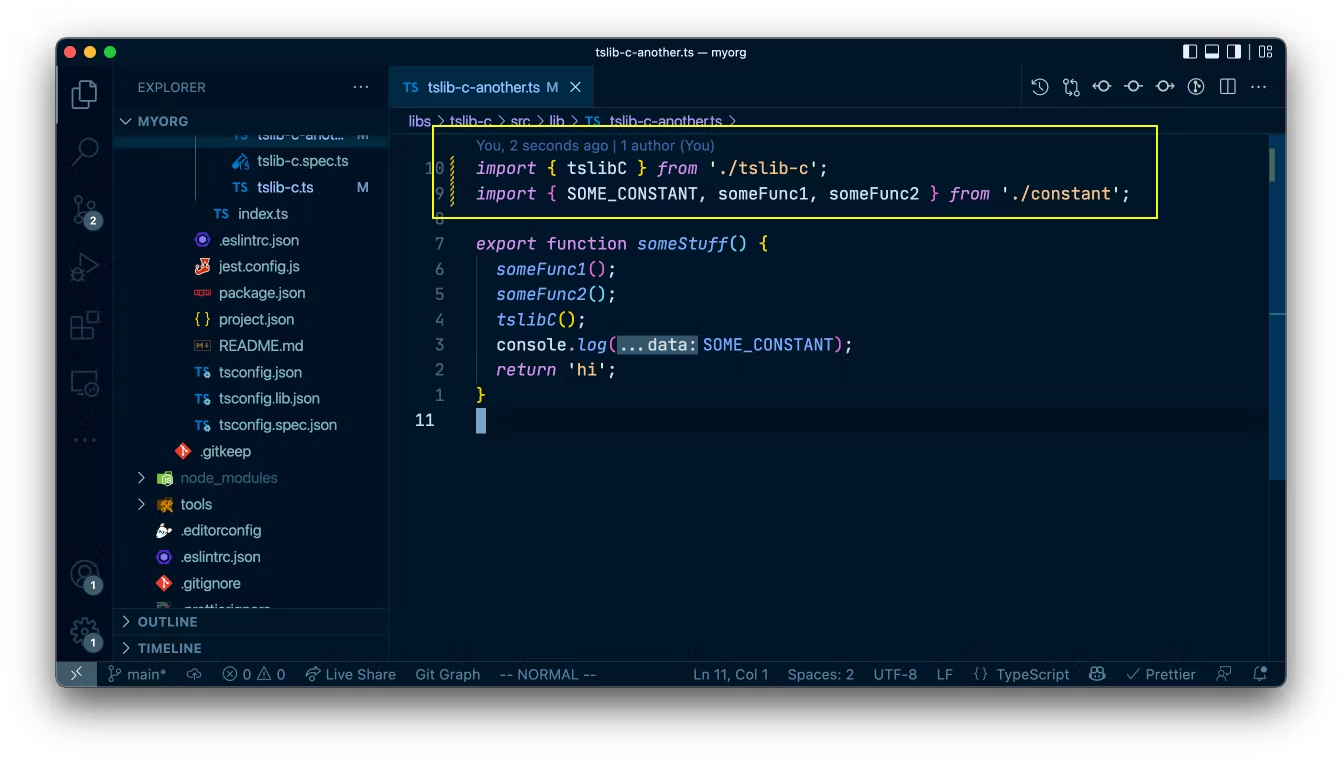 Automatic adjustment of circular self references when running the lint rule fix
Similarly if you have relative or absolute imports across library boundaries rather than using the NPM scope, you’ll get a linting error.
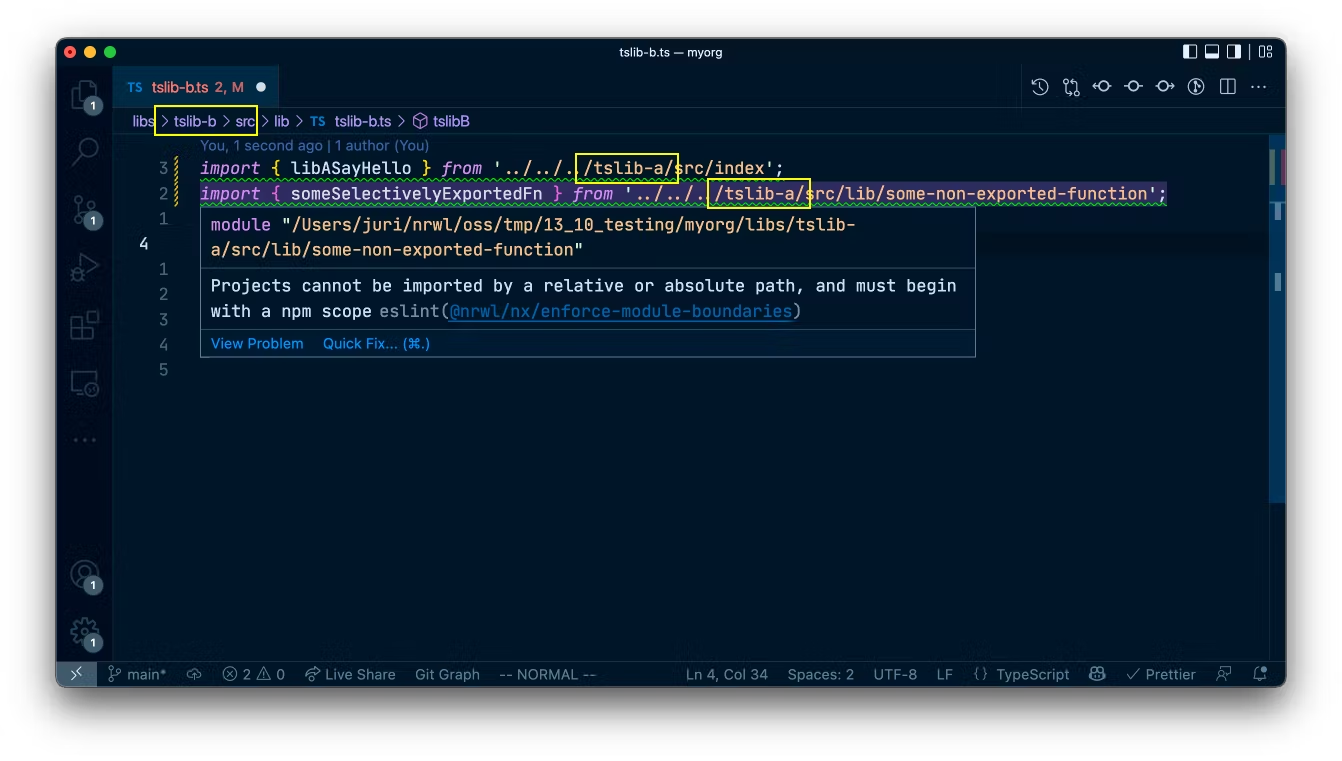 Lint error about relative import across library boundaries
Such imports will also be adjusted by applying the --fix to your linting command:
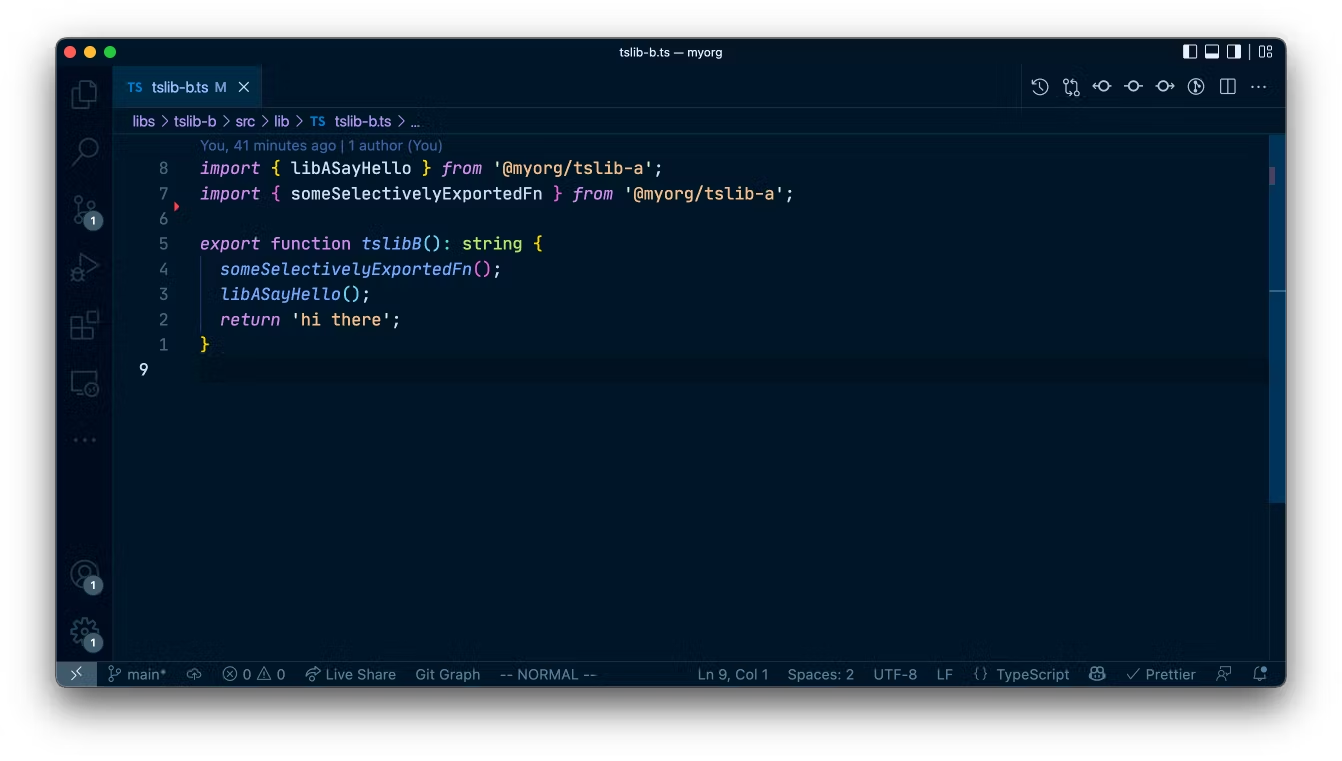 Automatic fixes for cross-library imports
React 18 support
Nx 13.10 introduces support for the latest React v18 release such that users can benefit from the latest features React has to offer. Check out our latest blog post on “The React CLI you always wanted but didn’t know about” to learn more how to use Nx for React development.
React Native gets Storybook support
We’ve drastically improved our support for React Native within Nx workspaces. Check out our latest blog posts on
We are happy to announce that in addition to the before mentioned improvements, the React Native integration in Nx now also supports Storybook. Just use
❯
npx nx generate @nrwl/react-native:storybook-configuration
or use Nx Console to get some more help in generating the Storybook setup.
Ability to show all prompts when creating a new Nx workspace
By default when you create a new Nx workspace with create-nx-workspace you will see a couple of questions that help you find the correct setup for your needs. However, we just show a couple of the possible options, to not overwhelm you.
If however you’re curious, you can now append --allPrompts to get all possible questions asked 🙂
❯
npx create-nx-workspace@next myorg --allPrompts
Alternatively you can browse the API docs on the Nx website to find out more.
Deliver the best possible TypeScript experience with @nrwl/js
You might have noticed our new @nrwl/js package we released a couple of months ago.
We have big plans with this one, not only making it the foundation for many of our other packages that need TypeScript compilation and support, but also the goto package for the best possible TypeScript experience.
Nx Console Improvements
Here are some of the highlights in the latest Nx Console release.
Nx Targets of VSCode Command Menu
You can now open the VSCode Command menu (Cmd + Shift + P or Win + Shift + P) and enter “Nx: Run Target” to invoke the Run Target menu which allows to choose the target to run as well as the project to execute the target on.
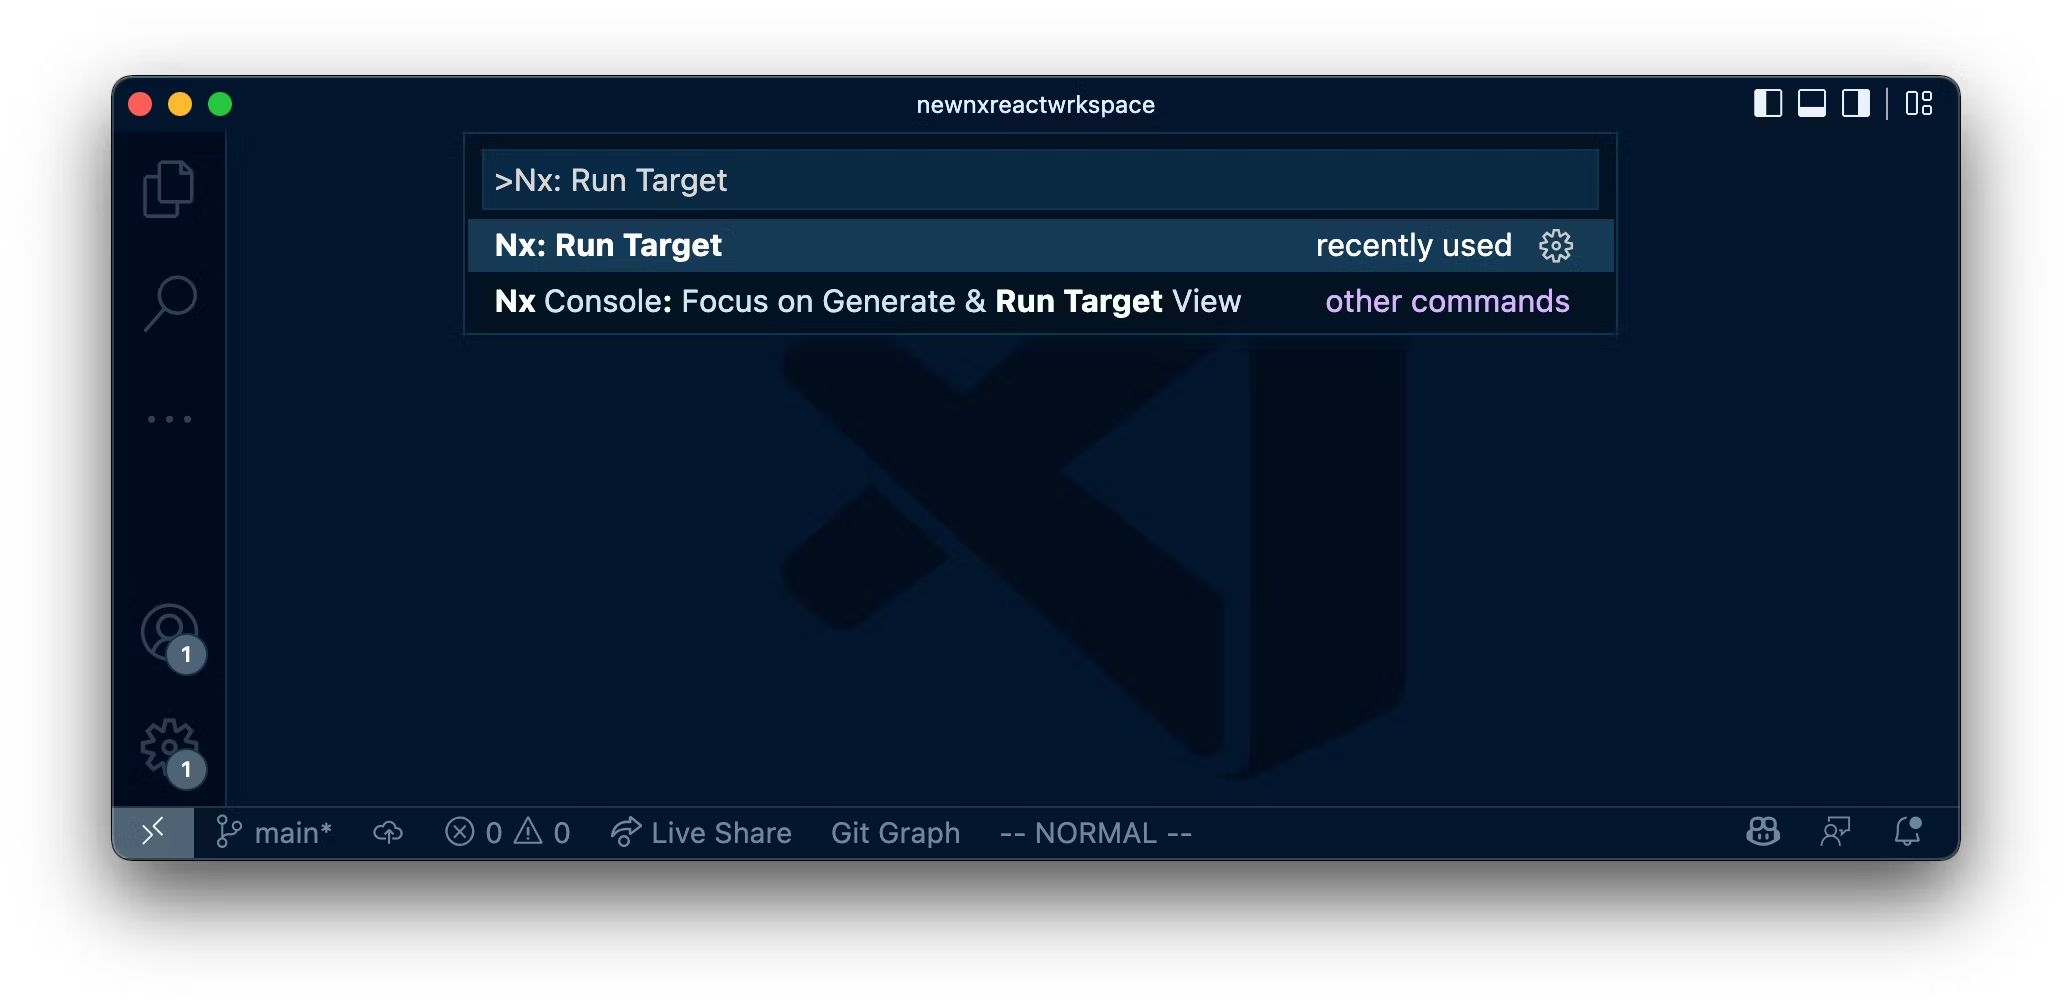 Commands can be invoked from the VSCode Command menu
Run Target View now in sync with workspace commands
While initially the “Generate and Run Target” panel was a static list of the usual Nx targets, it is now a dynamically generated list based on your actual workspace commands. Hence, also your custom defined targets will automatically show up.
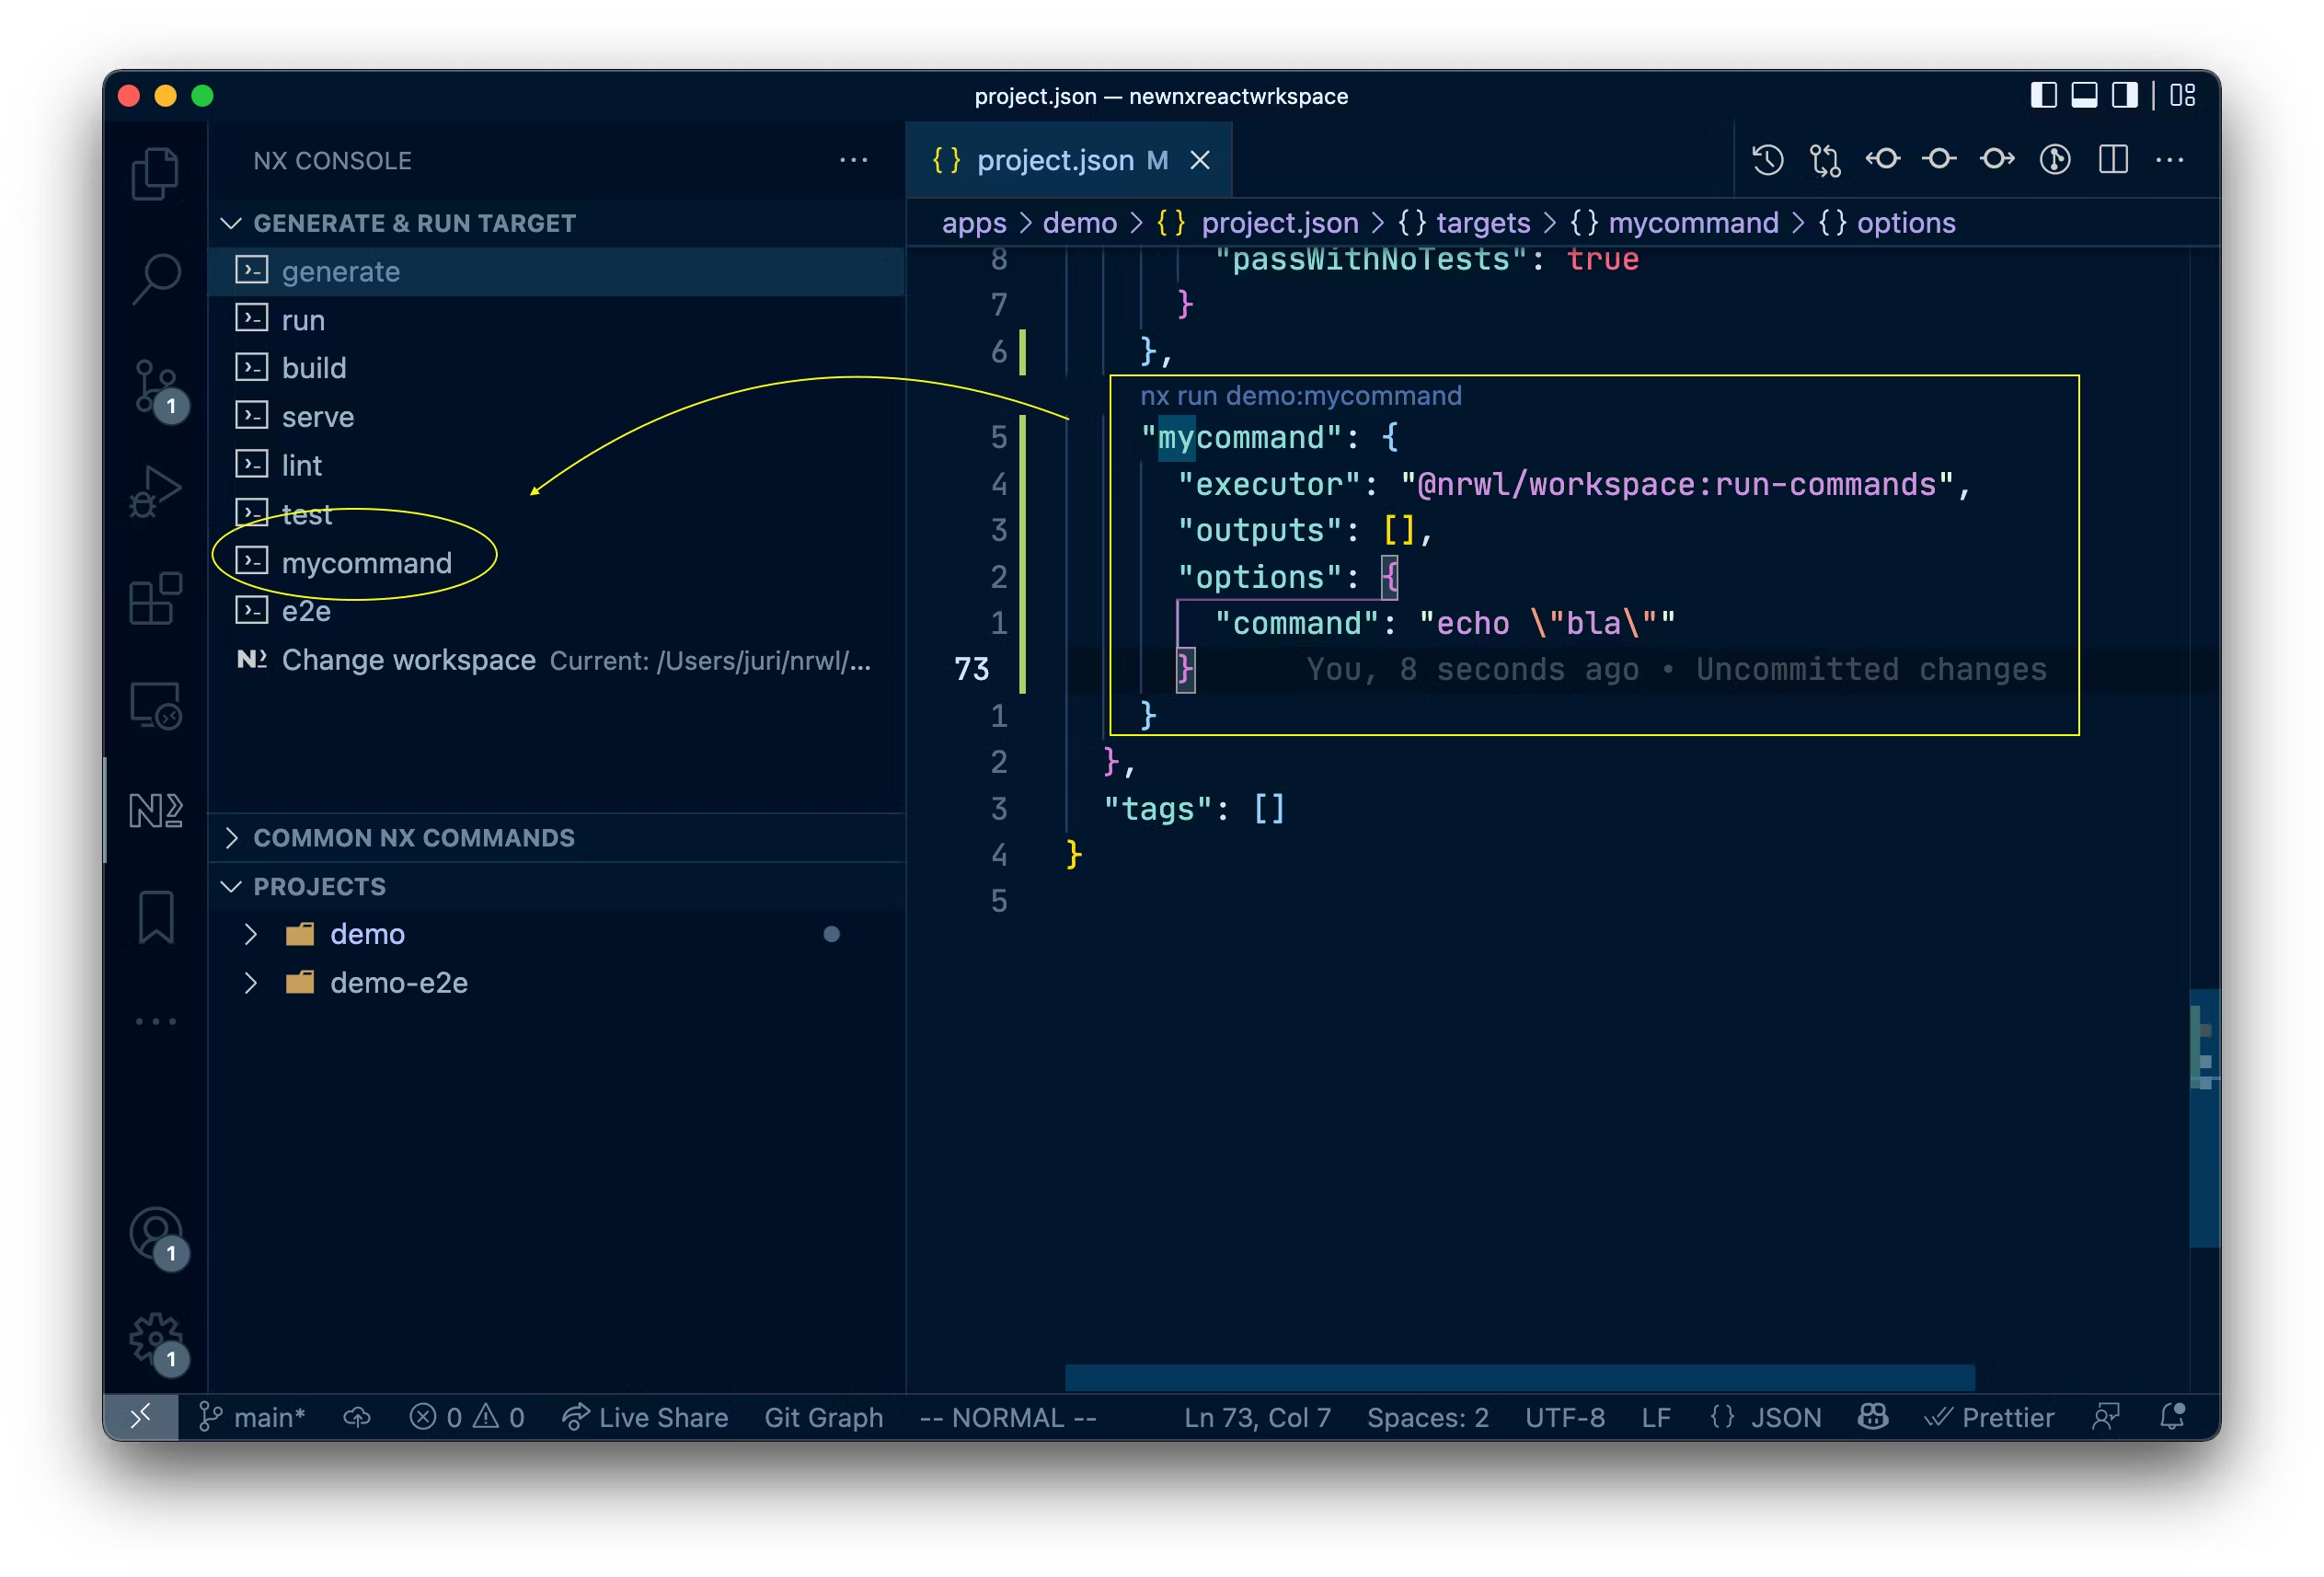 Nx Console dynamically reads Nx targets from your Nx workspace now
Prompts for Angular CLI users
Nx Console has out of the box support to also be used on plain Angular CLI projects. With the latest version of Nx Console, Angular CLI users will receive a prompt about decorating their CLI setup with Nx to benefit from the improved performance brought by computation caching and Nx Cloud.
Learn more in this short video walkthrough:
Our docs keep getting more and more awesome
Besides delivering awesome features, we keep improving our docs. They are essential to help discover new features and better understand existing ones. In the last weeks we’ve improved the navigation support, allowing you to navigate to a specific package with /packages/<package-name> such as /nx-api/react listing executors and generators that come with that Nx package, also improving the API docs of the individual executor options including a live embedded editor playground to experiment with different configuration setup.
Check out Benjamin Cabanes’ tweet with some short videos:
Loading tweet...
How to Update Nx
Updating Nx is done with the following command, and will update your Nx workspace dependencies and code to the latest version:
❯
npx nx migrate latest
After updating your dependencies, run any necessary migrations.
❯
npx nx migrate --run-migrations
Exciting?
Then wait for Nx v14 to land 😉.
- Check out the release changelog
- Follow us on Twitter, and
- subscribe to the YouTube Channel for more information on Angular, React, Nx, and more!
